Labels

Saturday, 11 May 2019

Lazy Days


Hello and welcome to my blog  :)  I'm sharing a cheerful little card with you today featuring some beautiful CB stamps from the Trees A Crowd, Floral Edges and Country Views sets; Distress Oxide inks, watercolour ink, white charcoal, black Versafine ink, clear embossing powder, black fine liner pen, die cuts and some gems from my stash.


On a piece of white card I stamped and embossed the tree with hills image in black ink and embossed it with clear powder.  I extended the lines of the hills with a fine liner pen then coloured the scene with Distress Oxides and a watercolour ink for the sky.


I coloured and shaded the trees with alcohol pens then stamped the grassy edge image along the bottom of the panel. 


I blended dark ink around the edges of the focal panel and added clouds with a white charcoal stick.   


I matted the focal panel onto some black card and attached it to a white base card.  I took a couple of floral die cuts from my stash and attached them to opposite corners of the focal panel, then added a gem to each.  On a spare piece of white card I stamped and embossed a sentement, die cut it, added ink through the die and added  black pen around the outer edges.  I then attached it to the card with 3D foam pads.


This is a lovely, cheerful card with a peaceful message that would suit any occasion and any recipient.  
Thank you for visiting my blog today, I hope you've enjoyed this post and that you'll pop in again soon  :) 

Purple Haze


Hi and welcome to my blog  :)  Today I am sharing a sample from the CB shows last month featuring stamps from the CB Trees a Crowd set; Distress Oxide Inks, white gesso paint, black Versafine ink and a stencil from my stash.


On a piece of white card I placed a circular mask near the top, this will create a sun for the finished picture.  I then placed a mask of 'mountains and valleys' from my stash onto the card, and began to blend the inks onto it.  I wanted to create a 'misty morning' effect so I chose to use shades and hues of purple and lilac.  The lightest colour was blended onto the the top of the card as the sky, then as I moved the mask down the card I deepened the colours of the ink.  This created a landscape of hills with perspective, that means that it has a distance, middle and foreground.  


I used a dry brush to add white gesso over the whole panel, this created the misty effect that I wanted.  


I removed the mask from the sun.  It was too white so I took the blending sponge with the lightest colour ink on it and dragged it lightly across the sun a few times to knock back the brightness a bit.


I took one of the tree images and stamped it in the lower third of the panel, then I stamped it again without re-inking which gives the effect of the second tree being behind the first.  I then stamped a smaller tree, using third generation ink, making it appear further away in the distance.  


I blended some black DI around the edges then I matted the focal panel onto purple card.  I took a white base card and stamped the small tree around the edges in purple DI, turning the stamp as I moved around the card.  


On a spare piece of white card I stamped and embossed a sentement then die cut it.  I added ink through the die then removed it and added silver pen around the outer edges.  I attached the sentement panel to the card with 3D foam.  


This is a great card for any occasion and any recipient.  I am really pleased with the result, the design turned out just as I wanted it to and it captures the whole 'mood' of a misty winter's morning.
Thank you for popping in today, I hope you've enjoyed your visit and you're welcome to look around my blog.  I hope to see you back again soon  :)


Sunday, 31 March 2019

Swirley Mannequin


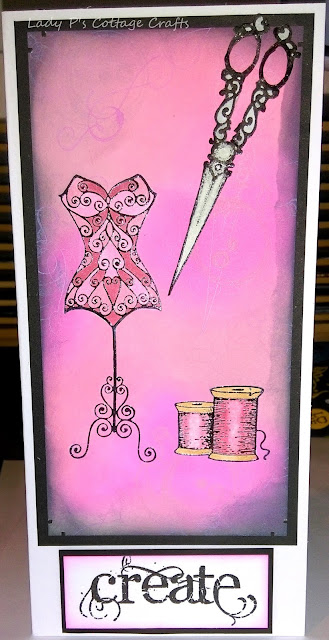
Hello and welcome to my blog  :)  I have another of my sewing room samples to share with you today.  I have used stamps from the Haberdashery, March Fairy and Artistic Affirmations sets; Distress Oxides, black Versafine, clear EP, alcohol pens, silver pen and masking tissue.    


On a piece of white card I stamped the swirly mannequin image in black ink and embossed it with clear EP.  I coloured the bodice with alcohol pens then masked the image.


I stamped and embossed an image of two cotton reels, coloured them then masked them as before. 


I created the background blending three shades of pink DOs.  


I stamped several worker images randomly all over the panel, using the same inks as the background.  I then blended black ink around the edges of the panel, removed the masks and matted it onto black card. 


I took a piece of acetate and stamped and embossed a pair of scissors as before.  I cut them out and coloured them on the reverse with a silver pen.  I then stamped and embossed the word 'Create' in black onto a small panel of white card.  I edged the panel with pink ink then matted it onto black card and attached both panels to a white base card.


This was a lovely little card to create, I'm not usually a 'pink' person, but I gave it a go and I'm very pleased with the result.  I think this would make a great birthday card, or even a retirement card for a seamstress!
Thank you so much for visiting today, I really hope you enjoyed this post and will pop in again soon  :)

Wednesday, 27 March 2019

Colourful Inspirations


Hi there, welcome to my blog  :)  I have a colourful, stylish card to share with you today.  This was one of my samples for the Chocolate Baroque tv shows in January and I have used stamps from the Sewing Room and Haberdashery sets; designer paper from the My Floral Soul set; Distress Inks, clear Sparkle pen, alcohol pens, black Versafine ink, clear embossing powder and a piece of acetate.


On a piece of designer paper I stamped a mannequin image in black ink and embossed it with clear powder.  I then coloured it with alcohol pens and blended black DI around the edges of the paper before matting it onto black card.  


I took a white base card and stamped  a lovely border image around the edges.  


On a spare piece of white card I stamped and embossed a couple of worker stamps and coloured them with the pens.  I then took a piece of acetate and stamped and embossed a pair of scissors.  I used a silver metalic pen to colour them on the reverse of the acetate then cut the scissors out.  I also cut the other embellishments out.  


I attached the focal panel to the base card then attached all the embellishments.


I then used a clear Sparkle pen to add some highlights and sparkle to the floral image on the designer paper.


To complete this design I stamped and embossed a sentement onto the background. 


This card was fairly easy to create but no less effective.  One of the best things about these beautiful papers is that they can be used for any card or journal page or home decor piece.  I have used the images, paper and sentement in this design to show that nature and being creative can come together to create something wonderful.
Thank you for popping in today, I hope you've enjoyed this post and that I'll see you here again soon  :)

Friday, 15 March 2019

Be My Valentine


Hello there, welcome to my blog  :)  I'm sharing a quick and simple card with you today, it is being featured on the Chocolate Baroque DT blog page as one of the 15 minute cards.  I have used images from the Haberdashery and Words of Love stamp sets, alcohol pens, a Clear Sparkle pen, black Versafine ink, clear embossing powder, and some dies from my stash.


I began by stamping the corset mannequin in black ink onto a piece of white card, and embossed it with clear powder.  I then stamped the word 'Love' and some small hearts in black and embossed them, colouring them in with the pens.  I added clear Sparkle pen to the images then matted the focal panel onto black card.  


I then used a couple of nesting dies to cut hearts out of black and red card.  I used a black pen  to write a sentiment on the red heart, added gold pen around the edges and matted it onto the black heart, then added gold dots around the edges.  I attached the panel to a red base card, cut out some more small hearts, then added them all randomly to the card.


And there we have it, a slightly saucy, fun Valentines card!  I make no excuse about the colours - not only are they perfect for Valentines day they are also one of my favourite colour combos.  
Thank you very much for dropping in today, I hope you've enjoyed this post and that you'll visit again soon  :)   


Tuesday, 5 March 2019

Oriental Mannequins


Hello and welcome to my blog  :)  I have a bright and cheerful card to share with you today, one of my samples for the Chocolate Baroque February shows.  I have used stamps from the Haberdashery and Floral Mannequins sets; Distress Oxide inks, black Versafine ink, clear embossing powder, gold pen, gold gilding wax and an embossing folder from my stash. 


I began by stamping one of the mannequin images from the Haberdashery set twice in black ink and embossing them with clear powder.  I painted the images with DOs then masked them with masking tissue  before creating the background.  I blended DOs on the piece of white card, then I stamped several worker images in the same colours randomly over the card.  


I removed the masks from the mannequins on the card, and added gold pen around the edges.  I took a piece of black card and embossed it in a folder, then added gold gilding wax to emphasise the pattern.  I attached the background panel to the embossed one and then attached them both to a white base card.  On another piece of white card I stamped and embossed the two floral mannequins, painted them with DOs and cut them out.  I then attached them both to the card over the first mannequins using 3D pads.  


On some spare white card I stamped and embossed a sentiment, one of the lace images (twice), a thimble, a pin cushion and some cotton reels.  I used a small tag die to cut out the sentiment, added DO ink through the die, like a stencil, while the card was still in the die.  I added gold pen around the outer edge of the tag and added some gold ribbon.  I coloured and cut out the other embellishments before attaching them to the card.  


 I really love these floral mannequins, they shouted 'Oriental' to me as soon as I saw them, the flowers and neckline remind me of chinese jackets.  This is such a colourful and cheerful card, I think it would suit a lot of occasions and recipients.
Thank you so much for dropping by today I hope you've enjoyed this post, and that you'll come back soon  :) 

Monday, 11 February 2019

Breaking Out


Hello and welcome to my blog  :)  I have something very different to share with you today.  I've really got into my mixed media lately, and one of the mediums that I am really enjoying working with at the moment is light air dry clay.  I use it with moulds and cutters to create 3D projects.  For this project I have used the latest moulds from Katy Sue Designs 'Realms of Fantasy' range, plus a few that had been released previously; I have also used acrylic paints, Pearl-Ex paints, Starlight paints, Hearty air dry clay, some dies and an embossing folder from my stash.


To start this project I made all the clay embellishments, pressing the clay into the moulds and then turning them out and letting them dry overnight.


Next I painted a mask with black gesso, and let it dry.  I used the Dragon Skin mould and some more clay to create some skin, then I moulded it over the mask and left it to dry insitue.  


I then created the eyes in the same way and added one of them to the front of the mask, adding it to the skin and over one of the eye holes.  I placed the other eye inside the mask behind the other eye hole, moulding it gently to the shape of the mask.  I removed it carefully and let it dry.   


When the clay was dry I painted the skin, eyes and claws with green acrylic paint and left them to dry naturally.


I made some clay ferns in both white and green clay, painting the white ones when they were dry.  I did this to create a variety of colours of ferns, making them look more natural.  I also created some clay tree bark with one of the moulds, and painted the bark with brown acrylic when dry.  I then added some highlights with Starlight paint by dry brushing over the bark.  I then die cut some cogs from black card and added gilding waxes.  I also made some clay cogs and did the same when they were dry.


I painted the eye balls with my old favourites, Pearlex paints.  I wanted the eyes to have a bright sheen to them.  I painted some veins with a very fine brush, and painted the slit iris black, before adding Glossy Accents.  I added another piece of skin on the other side of the mask and treated it in the same way.


I then added highlights to the skin with another Starlight paint.  


I added some strong PVA glue under the skin and the eye on the outside of the mask, then attached the other eye to the inside of the mask with 3D glue gel.  I began adding the cogs, hinges and some faux sheet metal that I had made from black card that I embossed in a folder before colouring it with silver gilding wax.  I cut the faux sheet metal into pieces and attached them to the mask with glue.  I then added some clay screws on top to make it look like the 'metal' is being held in place with them.  I added a clay lock and key to the mouth, to give the effect of clockwork.


I painted a canvas with acrylic paint and when it was dry I attached the mask to it.  I then attached the bark, breaking it into smaller pieces to fit it around the mask.  Finally I attached the claws and the ferns, to give the illusion of the creature peering out from a leafy forest.


.  As you will know if you have visited my blog before I LOVE my mixed media, and as soon as I saw these moulds I wanted to create a piece of artwork based around a decorated mask.  These  moulds by Katy Sue Designs are beautifully detailed, and I know I'm going to have a lot more fun with them!  The only question is .....is the lizard trying to break out from the clockwork man, or is the clockwork man trying to break free from the lizard?!!
Thank you so much for popping in today, I hope you've enjoyed this post, feel free to browse other projects on here, and leave a comment if you like!  I hope you'll come back to visit again soon  :)