Labels

Showing posts with label childrens. Show all posts

Monday, 27 January 2020

Breath, Dream Explore


Hello and Welcome to my blog  :)  I have a sweet little card to share with you today which was one of my samples for the Chocolate Baroque tv shows in December, using some of the fabulous Steampunk stamps.  I have used stamps from the Steampunk Funky Fish and Punky Expressions sets; Distress Oxide inks, black Versafine ink, metalic acrylic paints, clear texture gel, a stencil, die cuts and some air dry clay embellishments from my stash.  


I began by creating the background panel.  I took a piece of white card and blended three colours of DOs on it, then added some worker images randomly.  When all that was dry I took a stencil, applied texture gel through it  and left it to dry naturally.  I then added some ink around the edges of the panel.


I die cut some leaves that I would use for seaweed, and added some ink to the edges.  On another piece of white card I stamped a sea horse image in black ink and embossed it with clear EP.  I then painted it with metalic acrylic paints and cut it out.  I also coloured some air dry clay shells with the paints.


I took a white base card and stamped the same worker stamps around the edges to create a border.  I attached the background panel to the card then added all the embellishments.


I am really pleased with this card, it's a cheerful little project that would cover many occasions and recipients.
Thank you for dropping by today, I hope that you've enjoyed this post and that you will visit my blog again  :)

Friday, 7 June 2019

Magic Mushrooms


Hi there and welcome to my blog  :)  I have a cute little tag to share with you today that was one of my samples for the CB shows in May.  I have used stamps from the Mushroom House, Tagtastic and May Fairy sets; black Versafine ink, clear Versamark ink, gold and clear EPs, Koh-I-Noor paints, a clear Sparkle pen and some ribbon from my stash.


On a piece of white card I stamped the Tagtastic image with Versamark ink and embossed it with gold EP.  I then stamped the Mushroom House image inside the tag in black ink and embossed it with clear EP.  On another piece of white card I stamped and embossed a fairy and a small butterfly then I painted all the images.  I attached the card tag to a greyboard tag and cut around it.  I added clear Sparkle pen to the Fairy's wings then cut out the fairy and butterfly.    


 I threaded some ribbon from my stash through the top of the tag then added the butterfly and the Fairy with 3D foam.  


 This lovely tag can be used a variety of ways - it could be a bookmark, a piece of home decor, a keepsake or a topper for a card, and it would suit recipients of all ages.
Thank you so much for popping in today, I hope you've enjoyed this post and that you will visit my blog again soon  :)

Wednesday, 8 November 2017

Voyage of Discovery


Hello there and welcome to my blog  :)  I have one of my sample cards from the recent Chocolate Baroque Steampunk shows on tv to share with you today, which is also on the CBDT blog today.   I LOVE Steampunk, so working with these stamps was a dream!  I have used stamps from the Steampunkery and Steampunk Travel sets; Distress Inks, White Charcoal, alcohol pens,Sepia Versafine, gold embossing powder and clear EP.  


As always I stamped and cut out the images on copy paper, then used them to design the layout of my card. 


I stamped the Airship in Sepia ink and embossed it with clear EP.  I then masked the image and created a colourwash with Distress ink. 


When the background was dry I added some clouds with a white charcoal pencil.  These pencils are lovely for clouds and highlights, among other things, and are very easy to use.  


I removed the mask and used Distress inks to colour the image.


I used the white charcoal to add some cresting waves along the bottom of the panel, then blended DI around the edges.


On a white base card I stamped several words to create a border then blended ink around the edges again.  I stamped and embossed the winged cogs and heart image three times onto acetate in copper EP.  Next I coloured the images on the reverse side with alcohol pens and added a coat of white gesso to make the colour show through.  I then cut the images out.


I stamped the verse onto a piece of ivory card in Sepia ink and embossed it with clear EP.  I tore the edges, blended DI around them and added gold marker pen to create an aged look.


I matted the focal panel onto dark card and attached it to the base card.  I then attached the verse and embellishments with dimensional glue. 


This lovely card is quite a simple design but the airship image is so beautiful it didn't need much more.  I think this design is great for any age or gender, and for lots of occasions.  The focal panel looks so relaxing - what a lovely way to travel!
Thank you very much for popping by today, I hope that you have enjoyed this post and you'll drop in again soon  :)

Monday, 25 September 2017

Autumn Magic


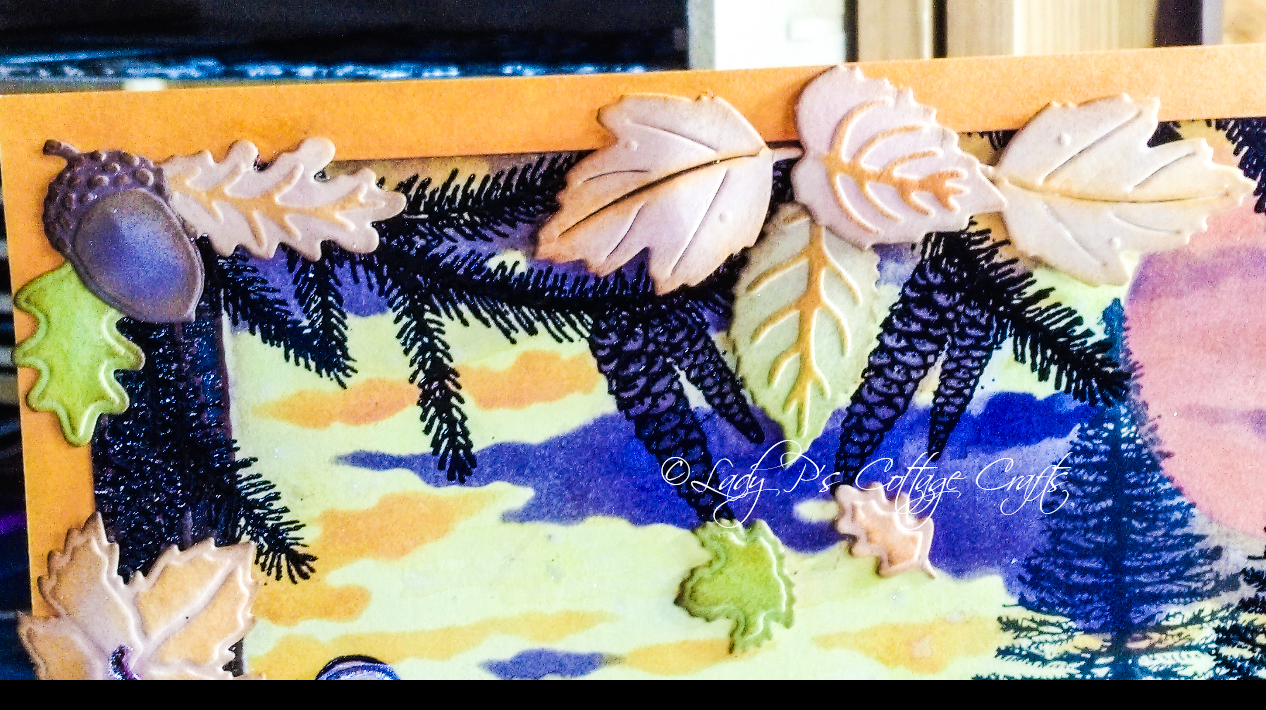
Hello there and welcome to my blog  :)  Today I am sharing a bit of Home Decor with you that I have created for the Lavinia Stamps September Challenge:   http://laviniastamps.com/lavinia-stamps-monthly-creative-challenge the theme is Autumn Equinox.  I have used Lavinia Stamp sets - Felicity, Fir Tree, Tree Roots, and a pine branch; Sparkle pens, Distress Oxide ink - Fossilised Amber, Distress inks - Wilted Violet, Spiced Marmalade, Vintage Photo, Versafine ink - sepia and black, clear and black embossing powder, Angelina fibres and film,  Chocolate Baroque Seasonal Journey stencil and die cuts from my stash.


I started by stamping the tree in Sepia ink and embossing it with clear powder.  I then stamped the fairy 'sitting' on the tree roots in black and embossed her in black powder, then did the same with the fir tree and pine branches.  I used 2nd generation ink to add more trees.  I coloured the tree with a brown Sparkle pen, then added a landscape with other Sparkle pens.  I used a circular mask to create a setting or rising sun behind the trees then made a colour wash of Fossilised Amber DO ink and painted a base for my Autumn Sky.  I then stencilled clouds onto the sky with DI's.  I removed the mask and coloured the sun with Sparkle pen and added more clouds.  To add a little more magic I faux bleached a small circle  and added some clear Sparkle pen, as though the fairy is holding a magical orb.


I colour washed some spare card using the sparkle pens, and die cut some leaves and acorns when dry.  I added some DI's to make them look like they were turning colour.  I then used the fibres and film with a craft iron to create some fairy wings.


I stencilled the word 'Autumn' in the bottom third of the scene using DI and added Vintage Photo ink around the edges.  


I matted the panel onto some orange card then attached that to some greyboard.  I then started to assemble the border of 3D leaves and acorns, using dimensional glue.   I also attached the fairy wings in the same way.


Well I absolutely loved creating this plaque, I had LOADS of inky messy fun and did lots of lovely embossing!  This design would make an excellent card for an Autumn birthday or a retirement card, or as a present for any occasion.
Thank you so much for visiting my blog today, I hope you like this post and will pop in again soon  :)  

Sunday, 28 May 2017

Punky Pistol


Hi and welcome to my blog today  :)   I've got a really fun project to share with you that I made recently.  I went to a local Steampunk event with friends and we decided to go 'armed' lol!  My friend bought us a plastic toy water pistol each to 'steampunk' and we both had a lot of fun doing it! 
I have used black gesso, silver, gold and copper paints and gilding waxes, dies from my stash, texture paste, black and Kraft card, liquid pearls, acetate, glow paint and metallic markers.


I began by painting the water pistol with a couple of coats of black gesso.


I had quite a few cogs, keys and so on already die cut, but I decided to cut a few more smaller ones as they would be more useful.  I wanted the gun to have an old, worn distressed look so I needed to age the pieces I would put on it.  I added texture paste to some of the pieces before using the waxes on them.  I added a mixture of white and teal Aquatints to the parts where the texture paste was to create a verdigris effect.


I then took a piece of black card and embossed it in a folder from my stash.  I painted it with a pearly slate colour and added silver gilding wax, to give it a sheet metal look.  


I used waxes, paints and pens to add metallic parts and a distressed metal effect.  I then began attaching the pieces using a glue gun.  I stamped some images onto acetate and cut around them before adding them.  I coloured the light bulbs with a coat of glow paint and a coat of acrylic.  I wanted the bulbs to glow in the dark!  


I then cut the embossed panel into pieces then attached it to the handle.  I wanted it to look like several pieces of sheet metal had been used to make the handle.  I used the waste circles from some of the cogs to create rivets, holding the sheet metal pieces together.  


 I added Pewter liquid pearls to create tiny spikes in a few places and that was my gun finished!


I thoroughly enjoyed myself creating this project, and I received a lot of compliments on it at the event too.  It certainly doesn't look like a plastic water pistol any more lol!
Thank you for popping by today, I hope you've enjoyed this post and will visit here again soon  :)