Labels

Thursday 29 March 2018

Unlock Your Destiny


Hello there, welcome to my blog  :)  I have another piece of mixed media art to share with you today, a canvas featuring the fabulous Andy Skinner Illusionary Artists stamps.  I have used stamps from the Gothic Grunge and Spook sets and also from Andy's Steampunk set; Pebeo Dyna acrylic paints, black gesso, Pebeo gilding waxes, white embossing powder, Versamark ink, black Softform paste, black sand texture paste; acetate, wooden cogs, a stencil,clay and metal embellishments from my stash.  


I began by taking a white canvas board and arranging the various elements and stamps  that I wanted to use for this project on it.  I moved them about until I was happy with the composition then I took a photo so that I would remember where everything went.  I added some white texture paste through a brickwork stencil and let it dry.  


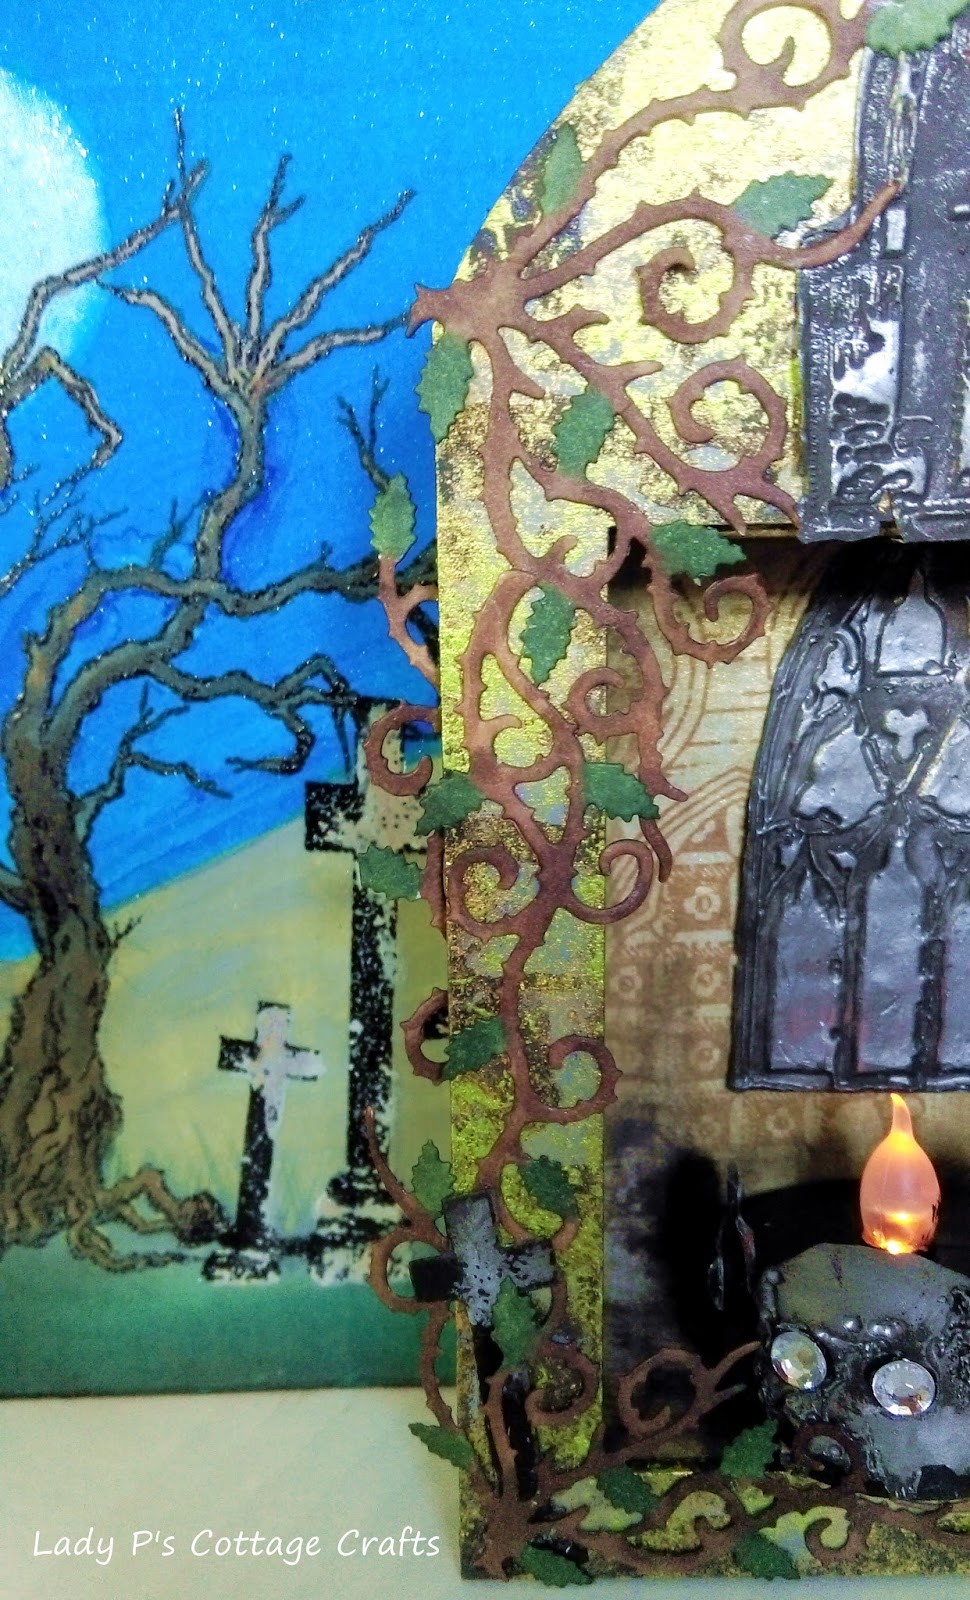
I took a couple of architectral images and spread black Softform paste over them, then left them overnight to dry completely.  When dry I just peeled the paste off the stamps and all the detail of the stamps had been captured in 3D. 


Meanwhile I had been busy whilst waiting for the paste to dry, I attached all the embellishments to the canvas and painted everything with black gesso.   I added the metal bird when the paint was dry.  


I wanted to add some stamped images too, one of which was a clock from the Steampunk stamp set.   I decided to stamp all the images that I was going to use onto acetate, and heat emboss them in white.  I wanted some texture behind the clockface and to have it in 3D from the canvas, so I drew around the stamped and embossed image which I had already cut out, onto a piece of cardboard.  I cut the circle out and peeled some of the top layer of card from it.  I then painted it in black gesso and attached it to the canvass.  


I wanted to add some rough, almost rusty texture to the cogs and the clock, so I added a little black sand texture paste to them and left it to dry. 


 Once all the paint and texture pastes were dry it was time to add some colour.  Using the dry brush technique I added some  Red Blue Dyna paint to the stencilled wall and the die cut wall.


I used metallic copper paint on the cogs, clock and tree, and gold on the single clay face and the padlock. I also added a little gold paint to the texture paste wall.  If there was any colour where I didn't want it I just painted black gesso over it.


The next step was to add silver gilding wax to create some highlights to the different textures.   


I also added silver gilding wax to the Softform paste embellishments which really brought all the lovely details of the stamps out.  I then attached them to the canvas.


On a piece of Kraft card I stamped the Ouija board image and embossed it in white EP.  I tore the edges of the card and blended Vintage Photo DI onto them.  I then attached it to the canvas, and added the rest of the stamped images on acetate.  


And here is the finished canvas.  I have had so much fun creating this, doing all the techniques, making the embellishments, and playing with colours.  I love mixed media and it is a while since I created something like this.  I have loved playing with Andy's stamps too of course!  I like to try and find different ways to use all my stamps, and these images  have lots of detail and interest which have enabled me to adapt them to create this lovely mixed media piece.
Thank you for visiting my blog today, I hope you've enjoyed this post and that you'll come back again soon  :) 

Thursday 22 March 2018

A Gothic Shrine


Hi there and welcome to my blog  :)  I have something a bit different to share with you today, a dimentional Gothic scene that I have created featuring the fabulous Illusionary Artists stamps by Andy Skinner.  I have used stamps from the Gothic Grunge and Spook sets, and some gorgeous stamps from Chocolate Baroque's Gothic Fragments set, for the background I used a tree from the Spooky Tree set by Sheena Douglass; I also used Distress Oxide ink, Distress ink, Black and Sepia Versafine ink, Pebeo Dyna paints, Pebeo Deco Cream paint, clear embossing powder, silver Softform Paste, black gesso, Sparkle pen, alcohol pens, red Stickles; an MDF shrine from Crafty Individuals, a brickwork stencil, bramble dies and a tea light from my stash.  


 I began by giving the MDF pieces a coat of gesso, when that had dried I painted them with grey Deco Creme paint.


I spread the Softform paste over the Andy Skinner stamps as I wanted textured images for my artwork.  I left them to dry overnight then peeled the paste from the stamps.  All the detail of the stamps had been reproduced in a silver, flexible, dimentional medium.  I then trimmed off any excess with scissors, and dry brushed a little black gesso onto the shaded areas to emphasize their darkness.  I stamped the stone crosses in black ink onto white card and embossed them in clear powder.  I then used DOs to colour them and cut them out.


Next I took a piece of copy paper and painted it with gold Dyna paint.  I used an almost dry brush as I wanted an uneven, distressed effect.  I then used Sepia Versafine ink to stamp several  CB images, to give a Gothic church effect for the inside of the box. When the ink was dry I  cut the paper into panels to fit the box.


I wanted the inside of the shrine to look as old and distressed as the outside so I took a dry brush again with black gesso and applied it to the bottom of the box, to give the effect of damp and mould.  


I used a brickwork stencil from my stash to apply black gesso mixed with brown acrylic paint to the MDF pieces.  This is the start of my 'old brickwork' effect for the outsides of the shrine.  When the paint was dry I sponged some green Dyna paint all over the top of the stencilling to give an eerie irridescent glow to the shrine, as if some glowing moss had attached itself to the brickwork!  I attached the arched front to the box, then I used dies to cut some brambles out of white card which I then coloured with alcohol pens before attaching to the MDF. 


For the next part of the project I took an ordinary battery operated tea light and painted the base with black gesso.  I then took the silver paste skulls and attached them to the base, and added gems to the eye sockets to make them look like spooky glowing eyes.


Now it was time to attach the other silver paste embellishments to the shrine, I put one of the windows inside the shrine and the other one fitted nicely onto the arch.  I attached the Gargoyle /Demon to some card to strengthen it and attached that to the top of the arch, as though the Gargoyle/Demon had come to life and perched on the roof.  I added red Stickles to the eyes because ALL Demons have red eyes lol!  


I attached the stone crosses to the front , placing them amongst the brambles.


I decided to create a background scene for my shrine, I wanted a creepy, deserted old graveyard scene.  I took a piece of white card cut to size and stamped a knarly old tree image and the stone crosses in black ink, then embossed them with clear powder.  I then used masking fluid to mask all the images.  I used a dark blue Sparkle pen to colourwash the top half of the card as a night sky, Distress Oxide to create a hill in the distance, and a dark green aqua pen to create a grassy foreground. I used a wide paint brush to create the background scene, and I created the effect of long grass by flicking the brush upwards lightly when applying the aqua pen.  When all the inks are dry I removed the masking fluid and coloured the tree with an alcohol pen.  I coloured the crosses with DOs.  To create the moon I faux bleached a circle amongst the branches of the tree before removing the masking fluid.  I added clear Sparkle pen to make my moon shine.


I attached the background panel to some stiff card to add strength, then attached that to the shrine.  Here are some close- ups of the completed project from different aspects.


I have had an absolute BLAST creating this shrine project!  As those of you who visit my blog reularly will know - I LOVE mixed media, as soon as I saw these Andy Skinner stamps I knew exactly what I wanted to do with them.  I'm so pleased with the result - it's just as I envisaged it would be.  I made all this up from an idea in my head, no patterns, no guide - this is how I like to work.  The only pre-determined thing is the MDF shrine, I created everything else to fit around that.
Thank you very much for dropping in today, perhaps you'd be kind enough to leave me a comment.  I hope that you have enjoyed this post and that you'll visit again soon  :)