Labels

Friday, 9 August 2019

Steampunk Angel


Hi there welcome to my blog  :)   Today I have a mixed media canvas to share with you that I have just finished, with a Steampunk theme.  I wanted to use the techniques that I had learnt from the Creative Craft Acadamy tutorial using products and embellishments from my own stash.  


I began with a canvas that I had started for another project which I subsequently adandoned.  I painted the canvas with two coats of white gesso.  It wasn't enough to blank out the colour that was already on the canvas, but it knocked the colour back and provided a smoother surface to work on.  Using a pallett knife I applied crackle paste around the edges of the canvas, this is a one step crackle paste which I applied quite thickly as I wanted large crackles.  I left the paste to dry naturally.


Whilst I waited for the paste to dry I gathered together everything that I wanted to use for this project:- a greyboard tag coated with white gesso, a panel of primed chipboard in the pattern of circles, a circles mask, MDF mannequin and butterfly wings, assorted metal embellishments and several air dry clay embellishments that I had made previously.


I painted the mannequin with black gesso and also some of the clay embellishments.  


I then used a couple of glimmer sprays to colour the primed chipboard.


Next I took the tag and applied crackle paste on just over two thirds of the tag.  I Left it to dry naturally which didn't take too long as I had applied a thinner coat of paste to get smaller crackles.  I then sprayed the tag which emphasized the crackles.


I added some purple Soft Form Reliefe Paste through the stencil onto the tag and left it to dry.


By this time the canvas was dry so the next step was to spray the top half one colour and the bottom half a co-ordinating colour.  The spray colours seeped into the cracks emphasising them, and the mica in the colours gave the canvas a lovely sheen.  


I chose a round metal bezel from my embellishment collection and added some gold gilding wax.  I then put Glossy Accents into the center of the bezel and added some blue sand crystals.  When that was dry I added a glass Steampunk cabochon that features a heart shape.  I wanted this to represent the Angel's heart.  


I next turned my attention to more of the embellishments, painting them and adding gilding wax.   


I began to assemble the tag with the larger wings first, attaching them directly onto the tag before building the Angel.  The MDF mannequin formed the body, and I attached the heart bezel to it along with several metal cogs.  Next to go on are the clay wings, then a couple of clay cogs and a metal embellishment on top.  I wanted to create a sort of headress for her.  I then topped it off with the head.  I continued to add more embellishments until I was happy with it.


Once the tag was finished I started on the canvas.  I cut the chipboard panel in half and attached it so that it would show either side of the tag.  I also added metal filigree corners.


I attached the tag in the center of the canvas, and added a few gems and pearls to some of the metal embellishments.  


I attached several  more embellishments around the edges of the canvas then added gold gilding wax around the sides of the canvas.


I had an absolute BLAST creating this!  I'm delighted with the way it has turned out, and I really enjoyed using all the techniques, products and embellishments - I shall definately be creating more mixed media pieces in the future.
Thank you for dropping by today, I hope that you've enjoyed this post and that you will visit my blog again soon  :)

Sunday, 4 August 2019

Baubles, Baubles Everywhere!


Deck the Trees


Hello there - welcome to my  blog  :)  I'm sharing a few quick and simple cards with you today, all were samples on the CB July tv shows.  For the first card I have used stamps from the Shaded Baubles, Christmas Circle and Robin the Spruce sets; Koh-I-Noor water colour paints, Distress Oxide ink, gold and white EP, a die cut, some ribbon and bows from my stash.  


I stamped and embossed both bauble images, one with white EP and the other with gold.  I then painted the images, the white embossed baubleI I painted green,  and the gold one I painted red.  I then stamped and embossed the Robin image in gold and fussy cut it out before painting it as before.  I took a white base card and stamped some Pine branches around the edges using Distress Oxide ink.


I attached the green bauble flat onto the card and the red bauble I attached with 3D foam pads.  I added some ribbon and bows to give the impression that the baubles are hanging from a tree, and stamped a sentiment onto the card.


Bauble of Light.


I have used the same stamps as for the last card; grey Versafine ink, Distress Oxide ink, Luxury smooth colouring paper, glitter, alcohol pens, silver pen, coloured card and a couple of dies from my stash.


I began with a piece of smooth colouring paper and stamped the empty bauble in one of the bottom corners with grey ink.  I then stamped Pine branches around the edges of the focal panel with DO ink and added silver pen around the outer edge.  I coloured the bauble with pens.........


.........and added silver peel-offs to create a string for the bauble to hang by.  


I then took some coloured card from my stash and die cut some Pine branches, blending DO ink to the edges of the die cuts.  I matted the focal panel onto a piece of darker card then attached it to a white base card.  I attached the die cut branches to the card in one of the top corners, then die cut a lantern and added Glossy Accents to look like glass.  When it was dry I attached the lantern to the card, then I stamped a sentiment onto a spare piece of card, matted it and attached it to the card.  


Vintage Compliments of the Season.


For this card I have used stamps from the  same sets as the previous projects; alcohol pens, Versamark ink, white EP, smooth Kraft colouring paper, Distress Ink, and a circle die from my stash.


I started this project by stamping and embossing the empty bauble twice onto the Kraft paper in white.  I then stamped both Christmas Circle images within the baubles and embossed them in white.  I used a circle die from my stash to cut the baubles out, then attached them to a cream textured base card.


I stamped a sentiment with DI on the front of the card.  


I'm very pleased with these cards, the beautiful stamps are an absolute pleasure to work with!  All the designs are simple and quite easy to recreate, they will all be suitable for batch making too - which is essential for Christmas!


Thank you for popping in today, I hope that you've enjoyed this post and have been a little inspired by these projects.  Feel free to browse more projects on my blog and to leave a comment if you wish, and I hope that you will visit again soon  :)


Saturday, 27 July 2019

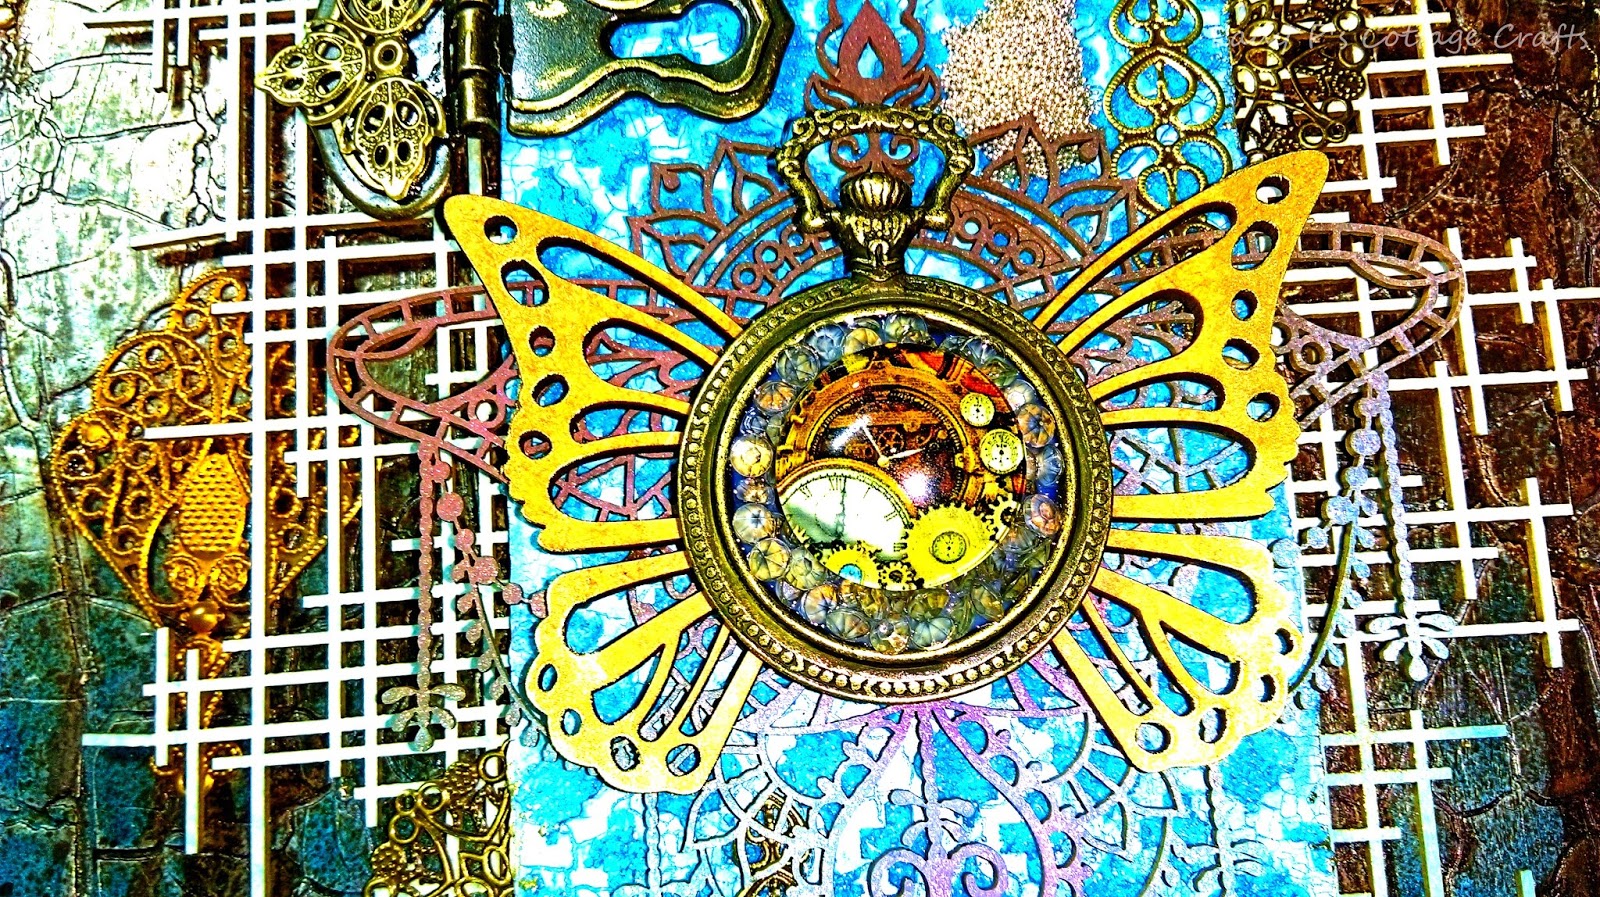
Wings of Time


Hi there and welcome to my blog  :)  I have a fabulous piece of Mixed Media to share with you today.  As I have said before I LOVE mixed media and it is such a wonderful and wide field of art that there is always something new to learn.  To that end I have recently become a member of the Creative Craft Acadamy, an online crafting tutorial site:-   www.creativecraftacademy.co.uk  where you can buy tutorials with or without the products to create them.  I bought both for this project.


The products are are also available from The Craft Box   (www.craftbox.co.uk)  It was so exciting to recieve that box of goodies!  I shall not be writing a step by step tutorial for this project as it can be found at the Craft Acadamy website, but I have several pictures of this beautiful project and I shall give a brief desription.


This project begins with an MDF substrate, onto which several layers of products including white gesso, crackle paste, and some spray paints were added.  


 The next step is adding another couple of layers, in fact this whole project is about layers and colours.  The kit includes some lovely chipboard and MDF items from SnipArt which can be coloured with paints, sprays, waxes or whatever you like.  


A chipboard grid was  sprayed lightly with one of the colours and partially adhered to the background.  An MDF tag  was layered as before, then using a stencil from the kit and a couple of other products that I made a texture paste with, a lovely raised pattern was added to the tag.  The tag was then attached to the background over the gridwork. 


A chipboard decorative moth was coloured with a pink spray ink and attached to the tag, then a pair of MDF wings which were left bare.  A fob watch bezel was then attached and filled with some glass beads.  I attached a Steampunk glass cabochon from my stash in the center of the watch.  


The final layer of this fabulous project is to add a bit more decoration, with metal embellishments and micro beads.


 I added some gold gilding wax around the edges of the panel and in a few places on the embellishments.


 I am really delighted with my piece of mixed media, and I learnt a lot from the tutorial too!  I have already bought another couple of projects with their kits and I can't wait to start playing!
Thank you for visiting my blog today, I hope that you've enjoyed this post, feel free to continue browsing, and I hope you'll pop back again soon  :)


Wednesday, 24 July 2019

A Garden of Blue and Green


Hi and welcome to my blog  :)  I've been creating a lot of mixed media lately, I really love using different techniques and mediums to produce artwork.  I have a piece of home decor mixed media to share with you today that I have created as my entry to the blog challenge at Country View  Challenges July Challenge - create anything using the colours blue and green :-  

For this project I have used stamps from Chocolate Baroque; several stencils from different companies including Chocolate Baroque, Hunky Dory, La Blanche, and TCW; various die cuts from my stash; Little Birdy chalk paint, Distress Oxide inks, Pebeo Dyna paints, and some Cosmic Shimmer glitter paste. I have also used some papers from my stash and some blue micro beads.


I began this project with a panel of greyboard which I painted with a pale green chalk paint, this particular paint has a really good coverage without the need of a primer.  When the paint was dry I took one of the stencils (script) and a blue DO ink and added some script randomly over the panel.  I then added 'splodges' of colour in a few places using a spray ink.  When dry I took another DO ink and stencilled a sort of firework burst image onto the spray painted parts.  This created flowers out of my ink 'splodges'  with the stencilled parts looking like stamens.  


I added some more stencilled patterns, using different colours and building layers.  One of the stencils I used was of Peacock Feathers, and I positioned them to go under my stamped Peacock to elongate the tail.


The final step in creating this background was to add glitter paste through another stencil, this time leaves, along the top edge of the panel.


. It was now time to create my peacock.  I stamped the image using black Versafine ink onto black card and embossed it with clear EP.  I then painted it with Dyna paints in blue-green, green-blue and gold.  When dry I cut it out.  


I used several sizes of flowers and leaf dies from my stash, cutting them out of papers from my stash and blending ink around the outer edges.   I added a little glitter to some of the foliage sprigs then assembled the flowers and placed them onto the panel.  When I was happy with their positions I attached them to the panel with 3D gel.  


I attached the Peacock with 3D gel and added blue micro beads to the centers of the flowers.  On some spare white card I stamped a couple of words in green DO ink and embossed them with clear EP.  I cut them into two small panels, added blue dots with a stencil, then edged them with a gold pen.  I attached the word panels to the artwork with 3D gel as before.


I loved creating this piece of Home Decor, and using different tones and shaded of the two colours for the majority of the design.  I love the bright, fresh feel of this piece too.
Thanks for popping by today, I hope that you've enjoyed this post and maybe been inspired to have a go at mixed media.  Feel free to browse through some of my other posts, I'd love it if you left me a comment, and I hope you'll drop in again soon  :)

Thursday, 4 July 2019

To Have and to Hold Heart


Hi there and welcome to my blog :)  I have a lovely wedding card to share with you today featuring some beautiful Chocolate Baroque stamps.  I have used the Hearts Full of Love set; Little Birdy hand made flowers, CB Masking Tissue, Versamark ink, silver EP, silver Brilliance ink, pearlescent paints, glitter, die cuts and some gems from my stash.


I took a piece of A4 pearlescent card then scored and folded it to create a base card.  I stamped the large floral heart image with Versamark ink and embossed it in silver.  I then masked the image with masking tissue and stamped another heart image repeatedly over the card, using silver Brilliance ink.  The Brilliance ink provides a subtle background with a lovely sheen.  


I stamped and embossed a sentiment onto a spare piece of card then cut it with a die from my stash.  I added a few tiny gems and went around the edges with a silver marker pen.  I  attached it to the card with 3D foam, then added some handmade paper flowers.  On a spare piece of card I stamped and embossed the flowers from the floral heart image, painted them and cut them out before attaching them with 3D foam.  I used some word dies from my stash to add another sentiment to the card, cutting the words from silver mirror card.  I then attached them to the card and added a couple of gems.   


I'm really pleased with this design, it is a simple one but no less beautiful for that.  I always enjoy creating wedding cards!  
Thank you for dropping by today, I hope that you've enjoyed this post.  Feel free to leave me a comment and to browse my blog, I'd love it if you did.  I hope that you'll pop in again soon  :)