Labels

Showing posts with label fairies. Show all posts

Friday, 7 June 2019

Magic Mushrooms


Hi there and welcome to my blog  :)  I have a cute little tag to share with you today that was one of my samples for the CB shows in May.  I have used stamps from the Mushroom House, Tagtastic and May Fairy sets; black Versafine ink, clear Versamark ink, gold and clear EPs, Koh-I-Noor paints, a clear Sparkle pen and some ribbon from my stash.


On a piece of white card I stamped the Tagtastic image with Versamark ink and embossed it with gold EP.  I then stamped the Mushroom House image inside the tag in black ink and embossed it with clear EP.  On another piece of white card I stamped and embossed a fairy and a small butterfly then I painted all the images.  I attached the card tag to a greyboard tag and cut around it.  I added clear Sparkle pen to the Fairy's wings then cut out the fairy and butterfly.    


 I threaded some ribbon from my stash through the top of the tag then added the butterfly and the Fairy with 3D foam.  


 This lovely tag can be used a variety of ways - it could be a bookmark, a piece of home decor, a keepsake or a topper for a card, and it would suit recipients of all ages.
Thank you so much for popping in today, I hope you've enjoyed this post and that you will visit my blog again soon  :)

Saturday, 7 October 2017

Moonlight Fairies


Hi and welcome to my blog  :)  Today I'm sharing another 'back in time' project  :D  This is one of my  samples from the Chocolate Baroque Fairy shows in April this year.  Fairies are good for adults and children alike and I tried to create a variety of projects that would suit any recipient.  I decided to create a silver and black design for a sophisticated adult card.  I have used stamps from the March, April and May Fairies, Magical Landscapes and Words to Dazzle and Sparkle sets; Aztec paints, Distress Ink - Broken China, silver and silver sparkle embossing powders.


I always stamp new stamps onto copy paper first to test them, then I cut them out and use the images to plan my design.


I began by creating the background panel, taking a piece of black card and stamping the castle and sentiment onto it, then I embossed them in silver.  I used Aztec paints to add some clouds and colour the images, then I used a silver marker pen around the edges of the panel.  


I took a white base card and stamped a flower and some swirls in blue DI around the edges, and blended ink onto the outside edges.   I then attached the background panel to it.  


On another piece of black card I stamped a large fairy image and embossed it in silver.   I painted it with Aztec paints and then cut it out.  I stamped two small silhouette fairy images onto black card and used a silver sparkle embossing powder.  I cut the images out then attached all three fairies to the card with dimensional glue.   As a final touch I added a small butterfly, made in the same way.


I really love this design, the simplicity of it really showcases these lovely stamps.  This card shows that Fairies can be for everyone, whatever their age.  I think this design makes a great worker card for a lot of occasions, and it's probably the nearest I shall get to creating a CAS card lol!  
Thank you for visiting my blog today, I hope you have enjoyed this post and that you will pop in again soon  :)    


Monday, 25 September 2017

Autumn Magic


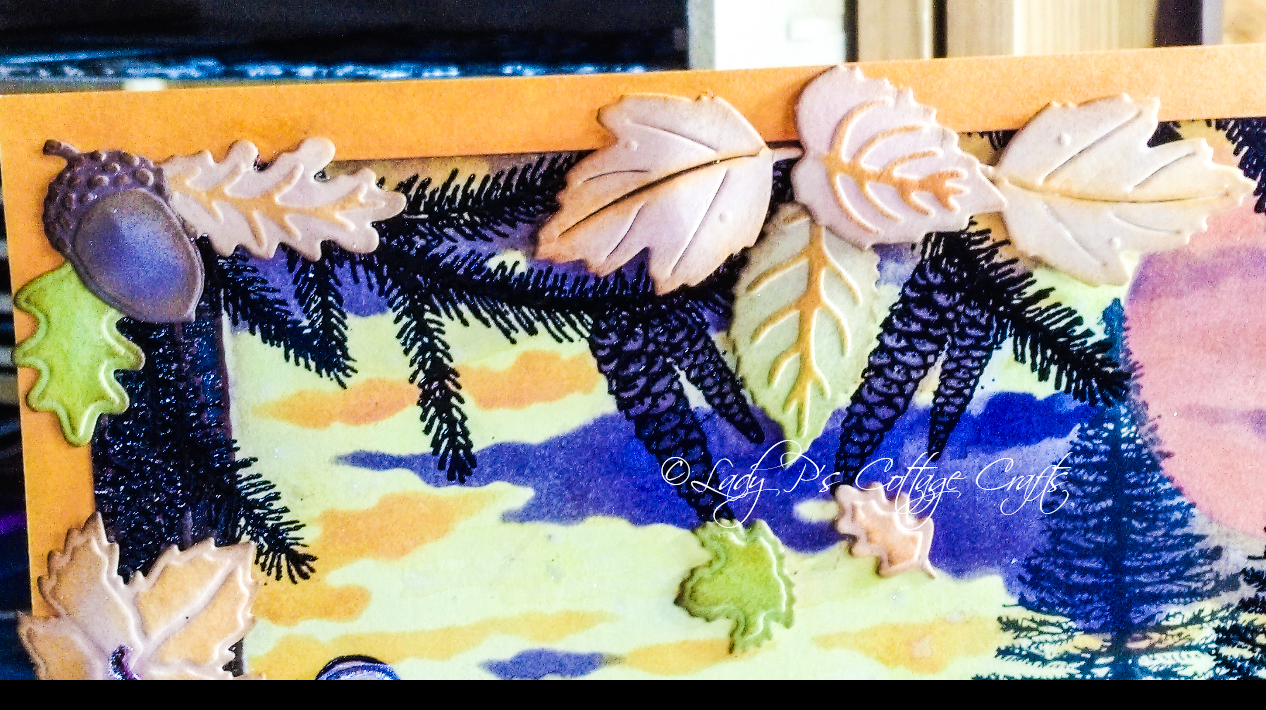
Hello there and welcome to my blog  :)  Today I am sharing a bit of Home Decor with you that I have created for the Lavinia Stamps September Challenge:   http://laviniastamps.com/lavinia-stamps-monthly-creative-challenge the theme is Autumn Equinox.  I have used Lavinia Stamp sets - Felicity, Fir Tree, Tree Roots, and a pine branch; Sparkle pens, Distress Oxide ink - Fossilised Amber, Distress inks - Wilted Violet, Spiced Marmalade, Vintage Photo, Versafine ink - sepia and black, clear and black embossing powder, Angelina fibres and film,  Chocolate Baroque Seasonal Journey stencil and die cuts from my stash.


I started by stamping the tree in Sepia ink and embossing it with clear powder.  I then stamped the fairy 'sitting' on the tree roots in black and embossed her in black powder, then did the same with the fir tree and pine branches.  I used 2nd generation ink to add more trees.  I coloured the tree with a brown Sparkle pen, then added a landscape with other Sparkle pens.  I used a circular mask to create a setting or rising sun behind the trees then made a colour wash of Fossilised Amber DO ink and painted a base for my Autumn Sky.  I then stencilled clouds onto the sky with DI's.  I removed the mask and coloured the sun with Sparkle pen and added more clouds.  To add a little more magic I faux bleached a small circle  and added some clear Sparkle pen, as though the fairy is holding a magical orb.


I colour washed some spare card using the sparkle pens, and die cut some leaves and acorns when dry.  I added some DI's to make them look like they were turning colour.  I then used the fibres and film with a craft iron to create some fairy wings.


I stencilled the word 'Autumn' in the bottom third of the scene using DI and added Vintage Photo ink around the edges.  


I matted the panel onto some orange card then attached that to some greyboard.  I then started to assemble the border of 3D leaves and acorns, using dimensional glue.   I also attached the fairy wings in the same way.


Well I absolutely loved creating this plaque, I had LOADS of inky messy fun and did lots of lovely embossing!  This design would make an excellent card for an Autumn birthday or a retirement card, or as a present for any occasion.
Thank you so much for visiting my blog today, I hope you like this post and will pop in again soon  :)  

Tuesday, 18 July 2017

Fairytail Castle


Hello and welcome to my blog  :)  I have a mixed media tag to share with you today that was one of my tv samples for the Chocolate Baroque Fairy shows.  I love mixed media, and tag art is so much fun to create.  I decided to give this piece a 'Rapunzel' Fairytale theme. I have used a stamp from the Fantasy Castles set; a stencil, die, metal embellishment and fibres from my stash; gold texture paste,white gesso, Distress inks, glitter, gold gilding wax.


I took a greyboard tag and coated it with gesso.   I then stamped and masked a castle. I created a wash with DIs and painted the tag in an ombre effect. 


I placed a stencil over the tag and added gold texture paste through it in a random pattern.  I removed the masking fluid and used DIs to paint the image.  I added Glossy accents and glitter to the domes of the castle, and coloured the spires with a gold gel pen.  I used a clear Sparkle pen to add some shimmer to the trees and the castle walls. 


I die cut a lock and some keys from card and coloured them with gilding wax.  I also added the wax around the edges of the tag, and added a metal butterfly.


To complete this lovely project I sprayed it with a coat of varnish and added some pretty fibres at the top.  As I said at the beginning tag art is great fun, and it can be any genre or style you want.  This piece would make a lovely book mark or keepsake as a present or home decor.
Thank you so much for visiting my blog today, I hope you've enjoyed this post and will pop in again soon  :)  


Sunday, 28 May 2017

Our Lady of the Woods


Hello and welcome to my blog  :)  Today I'm sharing one of my fairy samples from the Chocolate Baroque tv shows.  I have used stamps from the Fantasy Castles and March Fairy sets; Aztec Paints, Distress Inks, watercolour inks, glitter and a stencil from my stash.


As soon as I saw this fairy stamp she made me think of Lady Galadriel and Lorien.  As you will know if you've visited my blog before I am a HUGE Tolkein and Middle Earth fan!  I have already created a couple of pieces of artwork with a Middle Earth theme and this one will make a lovely addition.  So this card is my own version of Galadriel walking through Lorien.  I started by stamping a castle and some florals then masking them.


I washed over the card with Aztec paints, giving the background a lovely sheen.  I then placed a tree stencil over the top and inked through with DI.  When it was all dry I removed the masking fluid.


I coloured the castle and flowers with watercolour inks, and added a little glitter.  You HAVE to have glitter with fairies and fantasy - don't you lol?!


I blended DI around the edges of the panel and matted it onto black card.  I placed stamped copy paper images around the edges of the base card to decide where to put them.  I stamped the fairy and painted her.  I removed the wings and coloured her with alcohol pens and Aztec paints, then added glitter.


I stamped several images around the edges of the base card with DIs.  I then attached the panel to the card, and added the lady in 3D.  


I'm really pleased with this card, it's just how I wanted it to turn out!  This design has managed to capture the ethereal feel that I wanted, like a magical misty forest.I hope Galadriel would approve!  
Thank you for visiting my blog today, I hope you've enjoyed this post and that you'll pop by again soon  :)

Wednesday, 10 May 2017

Here Be Fairies


Hello and welcome to my blog  :)  I have a piece of home decor to share with you today, another of my recent tv samples.  I created this fairy door for the Spring Fairies shows, and it is one of my GDT projects this month on the Chocolate Baroque DT blog.  I have used the beautiful stamps from all three sets of Spring Fairies and Fantasy Castles; a wooden fairy door; Aztec paints, Distress inks, black Versafine ink, Aquatints, alcohol pens, glitter,clear and holographic embossing powders; an embossing folder from my stash. 


I stamped  the images onto copy paper and cut them out, then arranged them into a pleasing composition.


I drew around the doorway onto white card and cut out the shape.  I stamped a castle in the centre and masked it.  I then created a background with the Aztec paints, making a shimmering fantasy sky.  When that was dry I removed the mask and painted the castle with Aquatints and DIs.  


Next I painted the fairy door and doorway with the Aztec paints to give them a beautiful pearly sheen.  I then stamped a swirly image repeatedly around the top of the doorway and on the door using holographic powder.  This powder changes colour as it is heated and as the light hits it, so it appears magical.  I think it looks like ancient runes.  


I stamped the fairies, a butterfly and some florals onto white card with black ink and embossed them with clear powder.  I then painted them with Aztec paints, and added glitter when they dried.  I used alcohol pens for the fairies skin.


I decided to create a wall for my fairy door to go in.  I took a piece of Kraft card and embossed it with a brick pattern.  I washed the wall with white gesso, let it dry then blended DI around the edges.  


Now to assemble the piece.  I attached the panel with the castle to the back of the doorway, then attached the wall panel.  I decoupaged all the other images onto the front of the fairy doorway.   


And so my magical fairy door artwork was complete!  I LOVED creating this, and I think it would make a lovely present for a child or adult.  You are never too old for fairies hee hee!  The Aztec paints are so shimmery and the glitter adds a magical touch to everything.  


Thank you for visiting my blog today, I hope you've enjoyed this post and that you'll pop in again soon  :)