Labels

Wednesday, 14 October 2020

Inspiring Katya


Hello there, welcome to my blog  :)  I have a bright and cheerful card to share with you today, featuring more beautiful stamps from Chocolate Baroque.  I have used stamps from the Katya, and Words of Inspiration sets; one of the CB Strip Stencils, alcohol pens, a gold pen, DO inks and a couple of gems from my stash.


I took a piece of an old calender for this one, I liked the effect of the perforated edge of the paper plus the paper used is excellent for colouring.  I stamped Katya in grey ink then coloured her with pens.  I used a gold pen to accent the headdress and added a few gems.  I then used a DO through the stencil as a background.   


I matted the focal panel onto a piece of red card then attached it to a white base card.  I stamped a couple of words on spare paper and added the stencilled background.  I matted them onto red card and attached them to the card with 3D foam.  


This is a quick and easy card that could be used for all sorts of occasions, including to cheer someone up which is something a lot of us need at the moment.  
Thank you for visiting my blog, I hope that you've enjoyed this post and that you'll pop back again soon  :)

Monday, 5 October 2020

My Mate Bert.


Hello, welcome to my blog :)  This is a lovely Steampunk project that I completed several months ago, at the beginning of UK Lockdown during the Covid 19 pandemic.  I needed something to cheer myself up and what better than some Steampunk!  This project was from a kit that I got from Stamps Away (Ali Reeve), which I 'tweeked' a bit, adding a few touches of my own.
The kit is called 'Steampunk Man' and includes a skull and a couple of large cogs made from plaster of paris, some MDF cogs, the elements to create a pair of Steampunk goggles and much more.


I put the base and stand together and painted them with black gesso.  I added patina with a mixture of paint and black texture paste.  I then painted the skull with black gesso.  The next step was to create the top hat.  The kit included all the elements to make the basic hat.  The rim is made of MDF, the rest of the hat is made up of strips of black card.  On some narrow strips of the card I squeezed PVA glue in little blobs along the middle of the strips, and left them to dry.  When they were dry the blobs were clear and domed, I then added some of the patina mixture and some gilding wax made the strips looked like rivetted metal.  I wanted to decorate the top of the hat so I put some black card in an embossing folder with a metal tread pattern.  I applied gold, silver and copper gilding waxes to the embossed card, giving it a worn, distressed and rusted appearance.  I cut the card into pieces and attached them to the top of the hat, trimming the edges to fit.  I wanted to create the effect of a patchwork of sheet metal.   


There were MDF cogs in various sizes included in the kit which after painting with black gesso I added some EP, also from the kit, which gave the cogs the appearance of pitted metal.  I then added a little of the patina mixture to each cog.


I created some more embellishments using clay with moulds from my stash and painted them with gesso.  I then added some patina mixture as before and then used gilding wax to create a metallic finish.  I also added gilding wax to the sides of the hat and the MDF cogs.  I created several other embellishments and treated them in the same way.  


I attached the strips of 'rivets' and some of the finished cogs to the hat with a mixed media gel.
 added some clay screw heads to the top of the hat, to create the look of metal sheets that are 'screwed on'.  


I followed the instructions to create the Steampunk goggles, added gilding wax and attached them to the skull, which also has wax on it to bring out the features.  


I then attached the rest of the embellishments to the stand, placing them so that you have something to look at from all sides.


I absolutely love this!  It was a lot of fun to make and I think it looks stunning!  As I've said it was a kit from Stamps Away but I added several of my own embellishments and the patina mixture is mine too.  He stands on the desk in my craft room and keeps me company as I craft!
Thank you for popping in today, I hope you've enjoyed this post.  Please feel free to continue browsing my blog or leave me a comment, and I hope you'll come back soon  :)  


Friday, 12 June 2020

The Old Boiler Room


Hello, welcome to my blog  :)  I am sharing a piece of Steampunk home decor today, which in my opinion is a marriage made in heaven lol!  My love of Steampunk and Industrial genres never fail to inspire me and I love creating pieces of artwork in those genres.
For this project I have used an MDF substrate, a shadow box with a border of cogs; I have also used light air dry clay and moulds, Steampunk printed paper, black Gesso, acrylic paints, metalic paste, coloured crackle paste, printed 3D card figures and printed Steampunk die cut pieces, MDF cogs of various sizes, greyboard die cuts, Glossy Accents, Liquid Acrylic Wax, greyboard embellishments and black texture paste.  


I assembled the shadow box and added the base frame, then I painted it all with black Gesso.  I also painted the MDF cogs with Gesso.


I took some Steampunk themed printed paper and cut it to size to fit inside the frame, then  I distressed the edges of the paper with scissors.  I blended brown ink to enhance the distressed edges.  I used a small cog stencil in one of the top corners and applied some black texture paste.  I then did the same using a stencil of Industrial Lighting.  When the paste was dry I painted the light bulbs with a yellow neon acrylic paint and added some copper paint to the fillaments and also to the cogs.  I applied a coat of wax to the paper before attaching it inside the shadow box.


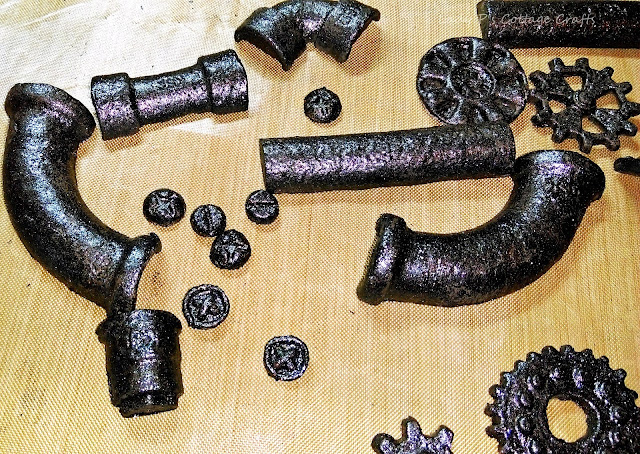
I created some pipes, cogs, screw heads and 'metal' sheets using air dry clay in moulds.  When dry I painted the clay embellishments with metalic paste.  This gave them a 'pitted' metalic texture and look. 


The next step was to age and distress the 'metal' pieces.  I applied some metalic copper paint by 'splodging' it on with a brush randomly.  I then added a mixture of black sand texture paste and turquoise paint, which gives the effect of Verdigris.  


For the next step I took the frame and applied copper crackle paste then left it to dry naturally, that way it gives better, natural looking crackles.    


It was now time to place all the pieces into position before attaching them with multi purpose media gel.  


I decided to add a couple of inventors.


After attaching all the embellishments inside the the shadow box it was time to attach the ones around the frame.  I had painted and aged the MDF cogs that came with the shadow box so I arranged them around the frame and attached them with the multi purpose media gel.  I also added a few printed die cut embellishments.


This is a project that I have wanted to do for a while, and I'm really pleased with the result.  I am especially happy with the way my hand crafted boiler turned out!  It was a lot of work - definitely not a quick project - but so worth it and I enjoyed every minute of it.  
Thank you for popping in today, I hope that you have enjoyed this post.  Feel free to browse further on my blog or drop in again soon  :)  

Thursday, 11 June 2020

Solitary Tree


Hello - welcome to my blog  :)  I have another of my CB samples to share with you from last month's shows.  I have used stamps from the Trees A Crowd set; acrylic paints, Gelli Plate, black Versafine ink, black fineliner pen, Distress Oxide inks.


For the background I chose one that I made some time ago with acrylic paints and a Gelli Plate.  I stamped the large bare tree image in black Versafine ink and embossed it with clear EP.  I then trimmed the panel a little and blended ink around the edges.  I used a black fineliner pen to draw a border around the painted area.     


I took a Kraft base card and stamped a smaller tree image along the two sides to create a border, then attached the FP to the base card.I also blended ink around the edges of the card to complete the design.   


This is a lovely quick card, good for those last minute makes!  I think it's suitable for many occasions and any recipient. 
Thanks for popping in today, I hope that you have enjoyed my post.  Do feel free to browse further on my blog, and I hope that you'll come back soon  :)  

River King


Hello and welcome to my blog  :)  I am sharing one of my Chocolate Baroque samples today, from last month's shows on tv.  I have used stamps from the Kingfisher Song and Sticks and Stones sets; water colour paints, Distress Oxides, sepia Versafine ink, clear EP.


On a piece of Drawing Cartridge I stamped the Kingfisher, branch and bridge scene images in sepia Versafine ink, then embossed them with clear EP.  I made some masks out of masking tissue and masked the images.  I then created the background, painting with watercolours.  I created a dawn (or dusk) sky and a calm, tranquil riverside scene.  When the background was dry I removed the masks and painted the images. 


I matted the focal panel onto dark card, then on a spare piece of white card I stamped and embossed the Flag Iris image twice before painting them with the water colours.  I used a white acrylic paint pen to add highlights to the Kingfisher.  I cut out the flowers and attached them to the focal panel with 3D glue.


I took a white base card and stamped several worker images around the edges using Distress Oxide inks.  I then attached the FP to the base card.


This is a lovely card that would suit any occasion and any recipient, a lovely Spring scene.  I am especially pleased with the background and the way the colours have blended.  
Thank you for popping in today I hope you have enjoyed my post.  Feel free to browse my other posts, maybe leave me a comment, and I hope you'll be back again soon  :)   

Tuesday, 7 April 2020

Kraft Poppies


Hi there welcome to my blog  :)  I have a quick and easy card to share with you, another of my DT samples.  I have used stamps from the Poppy Ledger and Make your Mark sets; Distress Oxide inks, black Versafine ink, sepia Versafine ink, clear EP and a black pen from my stash.


I took a piece of Kraft card and stamped the Poppy Ledger image in black ink then embossed it with clear EP.  I used DO inks to paint the colour on the poppies.  I then stamped the cracked image in sepia ink around the edges of the Kraft card, using first and second generation ink.  I did the same with the small circle image.   


On a spare piece of Kraft card I stamped and embossed a sentiment then used a black pen around the edges of the panel  and did the same with the focal panel.  


I attached the focal panel to a white base card and added the sentiment panel.


I love this stamp!  I think it really suits being used with Kraft card, and of course the flowers can be any colour.  It's a lovely design that I think could be used for any occasion and recipient.
Thank you for visiting my blog today, if you enjoyed this post feel free to browse more of my work and come back again soon  :)