Labels

Friday, 28 July 2017

Sparkling Blue Poppy


Hello and welcome to my blog  :)  I have another of my tv samples to share with you today, from the recent Chocolate Baroque ODS shows.  As well as the beautiful stamps in this launch I am totally in love with my Distress Oxides!
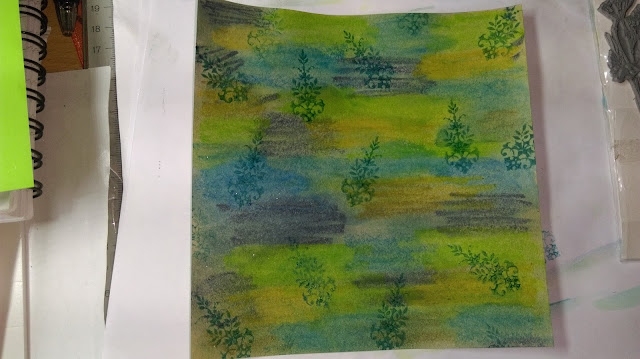
I have used the Chocolate Baroque Floral Harmony stamp and a sentiment from the Mackintosh Words set; Distress Oxides - Faded Jeans, Wilted Violet and Broken China, Black Versafine ink, Distress Ink - Chipped Saphire, Clear Sparkle pen; dies and a gem from my stash.


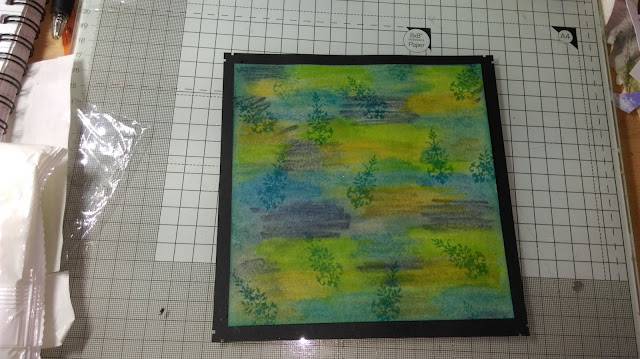
To start this design I created the background on a piece of white stamping card.  I applied the DOs to my glass mat and spritzed them with water, then I placed the card on top and moved it around to create a lovely colour wash.  


Next I stamped the floral image onto the background with Versafine ink.  I used a little DO ink to colour the flower, then I added Sparkle pen to it and also to the seed heads.  I matted the focal panel onto black card and attached it to a white base card.  


I die cut some more black card with dies from my stash and attached them to the card.  I added a couple of gems and stamped a sentiment in Versafine ink.


This is one of my favourite samples from this launch.  I love the colours and the simplicity of the design, the DOs and the stamp do all the work and needed just a few little embellishments to complete the look.  I think this design could be used for lots of occasions and would suit all ages.
Thank you for popping in today, I hope you've enjoyed this post and that you'll visit again soon.

Thursday, 27 July 2017

Golden Garden


Hello there and welcome to my blog  :)  Today I am sharing one of my tv samples for the recent Chocolate Baroque One Day Special shows featuring the launch of their fabulous new stamps and colouring papers.  
For this card I have used the Chequered Flowers and Take It or Leaf It stamp sets; Distress Inks - Spiced Marmalade, Mustard Seed and Dried Marigold; gold embossing powder, gold marker pen, white gel pen; ribbon from my stash.


I began by creating a background by blending DIs onto a piece of white card.  When it was dry I stamped a leafy bough in first and second generation ink.  In the corners I stamped a small leaf in the same way.


I stamped the same leaves around the edges of a white base card using the DIs then blended ink around the very edge.  


I stamped the flowers and embossed them in gold.  I added white gel pen to parts of the images then added some dots .  


I took another piece of card slightly bigger than the focal panel, coloured the edges with gold pen then matted the panel onto it.  I added some ribbon to the bottom of the panel, I then attached it to the base card.  I took a piece of spare card, blended inks as before, then stamped and embossed a sentiment in gold.  I edged the card in gold pen and added some dots with the white gel pen, then attached it to the card.  


This is a lovely cheerful design that was great fun to make.  The beautiful stamps are so versatile, any cards made with them can be used for lots of occasions, and their stylised look will suit male or female cards.
Thank you very much for visiting my blog today, I hope you have enjoyed this post and will pop in again soon  :)

Fligh High


Hello and a warm welcome to my blog  :)  Today I am sharing a card that I have created for the Country View Challenge blog's July challenge - 'Things with Wings'.  http://countryviewchallenges.blogspot.co.uk/
I have used stamps from Visible Images - Butterfly Inkognito, Chocolate Baroque - Just Butterflies and a sentiment from Sheena Douglass sets; Distress Oxides - Peeled Paint, Spiced Marmalade and Fossilised Amber, Distress Inks - Spiced Marmalade, Fossilised Amber, Black Soot, Black Versafine Ink, gold glitter texture paste, clear embossing powder, gold marker pen and clear Sparkle pen.


On a piece of white card I have created a colourwash with the DOs by putting them onto my glass mat, adding water then patting and swirling the card over the inks to mix them on the card.  I repeated this on a spare piece of white card.


Next I stamped the large butterfly in black ink and embossed it with clear powder on the background panel.  I then blended black DI around the edges.


I then stamped and embossed two smaller images onto the spare card, added Sparkle pen to the wings, and cut them out.


I stencilled the matching small images onto the panel with DOs.   I wanted to add some more texture so I applied gold glitter texture paste through a stencil and left it to dry.  I also added some dots around the butterfly with a gold marker pen.


I used the gold pen around the edges of the panel then matted it onto black card.  I placed the front of a white base card into a 'Textures' folder and embossed it, then blended DI's around the edges, emphasising the pattern.  I attached the panel to the base card then added the small butterflies. 


To finish the card off I added a sentiment in black ink.


I am so pleased with this design and the way all the elements come together.  Although I have used butterflies, I think that the main focal image would suit male and female cards of all ages for many occasions.
Thank you so much for visiting my blog today, I do hope you've enjoyed this post and will pop by again soon  :)

Wednesday, 26 July 2017

Elegant Peacock Mask


Hello and welcome to my blog  :)  Today I am sharing a fun project with you which is my final Guest Designer post on the Chocolate Baroque DT blog.  http://chocolatebaroque.blogspot.co.uk/  
I love creating decorative masks and this is the first mask of this shape that I have done.  This shape made me think of a Grand Masked Ball so I wanted to create something elegant and opulent.  I have used stamps from Chocolate Baroque's Peacock Parade and Tangled Peacock sets; gold gilding paint, Blue Lagoon Versafine ink, gold embossing powder, Distress ink, gold acrylic paint, black artist' marker and gems from my stash.   


I took a piece of white card and stamped two Peacock tails and the body of another peacock, then embossed them all in gold.  I cut them out carefully then painted them.


I painted the mask itself with gold gilding paint, which has a beautiful lustre to it.  I used a black marker pen to accentuate the eye holes, and used a couple of worker stamps to decorate the mask.


I added tiny gems from my stash to the two tails, then added bigger gems to a couple of the stamped images on the mask.


I then attached the tails to either side of the mask, and the Peacock body to the centre of the mask just above the nose.


I added a couple more tiny gems by the eyes.  I then added some ribbon to tie the mask on with.


I'm so pleased with this project and I absolutely love this mask!  The Peacock sets are among my favourite stamps from Chocolate Baroque as you will know if you have seen previous posts on my blog, and they were the obvious choice for this mask.  This project was great fun to do and I think it makes a lovely piece of home decor as well as a fun accessory for parties!
Thank you very much for stopping by my blog today, I hope you have enjoyed this post and will pop in again soon  :)  


Wednesday, 19 July 2017

Poppy Dreams


Hello and welcome to my blog  :)  Today I am sharing my second project for my Guest Designer spot on the Chocolate Baroque Design Team blog,  http://chocolatebaroque.blogspot.co.uk/.  I wanted to create a card AND use my new Distress Crayons!  
I have used stamps from the Chocolate Baroque Poppy Meadow and Words of Inspiration sets; Distress Crayons, black Versafine ink, metallic colouring pencils, bits and bobs from my stash.


I took a piece of Neena Desert card and scribbled several colours of DCs all over it.  I put a little water on my finger and blended the colours, re-applying some of them if I wanted more colour.


I used one of the worker stamps in the Poppy Meadow set to stamp randomly over the background panel, in 1st and 2nd generation DI.  I then blended DI around the edges.


When I was happy with it I matted the panel onto black card then layered it onto a white base card.


I then took another piece of black card and stamped a large Poppy image and embossed it in black.  I used metallic colouring pencils to colour  the Poppy taking inspiration from the Himalayan Blue Poppy.  Next I cut it out with a small border.


I shaped the Poppy with a ball tool and attached it to the card with dimensional glue.


I added some cotton lace, ribbon and a button from my stash with red liner tape.


I then took another piece of Desert card and stamped and embossed a sentiment in black.  I die cut the sentiment into a tag, blended ink around the edges and threaded ribbon through it.  I attached it to the card with 3D foam pads.  I then added some stickles in a co-ordinating colour. 


This was my first play with Distress Crayons and I'm delighted with the result!  I'm also really pleased with this design, I think it would suit a lot of occasions for either male or female cards.
Thank you for popping by today, I hope that you have enjoyed this post and will visit again soon  :)

Tuesday, 18 July 2017

Fairytail Castle


Hello and welcome to my blog  :)  I have a mixed media tag to share with you today that was one of my tv samples for the Chocolate Baroque Fairy shows.  I love mixed media, and tag art is so much fun to create.  I decided to give this piece a 'Rapunzel' Fairytale theme. I have used a stamp from the Fantasy Castles set; a stencil, die, metal embellishment and fibres from my stash; gold texture paste,white gesso, Distress inks, glitter, gold gilding wax.


I took a greyboard tag and coated it with gesso.   I then stamped and masked a castle. I created a wash with DIs and painted the tag in an ombre effect. 


I placed a stencil over the tag and added gold texture paste through it in a random pattern.  I removed the masking fluid and used DIs to paint the image.  I added Glossy accents and glitter to the domes of the castle, and coloured the spires with a gold gel pen.  I used a clear Sparkle pen to add some shimmer to the trees and the castle walls. 


I die cut a lock and some keys from card and coloured them with gilding wax.  I also added the wax around the edges of the tag, and added a metal butterfly.


To complete this lovely project I sprayed it with a coat of varnish and added some pretty fibres at the top.  As I said at the beginning tag art is great fun, and it can be any genre or style you want.  This piece would make a lovely book mark or keepsake as a present or home decor.
Thank you so much for visiting my blog today, I hope you've enjoyed this post and will pop in again soon  :)  


Wednesday, 12 July 2017

Mackintosh Lantern


Hi there and welcome to my blog  :)  Today's post is one of my tv samples from the recent Chocolate Baroque Mackintosh shows.  It is my turn to feature three projects on the DT blog this month  http://chocolatebaroque.blogspot.co.uk  so I chose this as the first.  I have used stamps from the Mackintosh Windows set; alcohol pens, silver gilding wax, silver embossing powder;  an embossing folder from my stash, black card, parchment paper, gems from my stash.


  This pretty lantern was made entirely from scratch and without a template, so there are no measurements.  It does mean however that you can adapt this design to fit any stamps you have in your stash.  I took an A4 piece of  parchment paper,  stamped each of the window images and embossed them in silver.  I then turned the parchment over and coloured the images on the back with alcohol pens.  This gives the coloured areas  a more muted look.   I cut the images out, leaving a large border around each one creating four panels.


I then took a piece of A4 black card and embossed it in a folder.  I added gilding wax to bring out the pattern.


I turned the card over and score it three times to create four equal panels. I then measured the width of one of the panels, and used that measurement (measuring from one of the long edges) to score along the length of the card across all the panels.  I made a cut on each panel from the same edge along the first score lines up to the long score line.  This  makes four small panels to fold up as the base of the lantern.  I trimmed one side of each base panel with a diagonal cut to enable each panel to sit well on top of each other.   I then placed a parchment panel onto each of the card panels and marked four spots on the card, just inside the edges of the parchment, leaving enough of the parchment to attach the panels to the inside of the card.  Using a craft knife I cut between the marks to create an aperture in each of the four panels.  


I cut apertures in each of the card panels and used red liner tape to attach the parchment panels, still working on the back of the black card.  I used the liner tape to assemble the lantern. Using another piece of black card I cut a square slightly larger than the base of the lantern.  I marked the size of the lantern on the card then scored along each side, leaving a border.  I cut a wedge out of each corner from one edge to where the score lines cross, leaving a small flap.  I then folded the border into the centre of the square, creating a little platform and attached all the flaps inside it.  I placed the platform inside the lantern at the bottom and put a battery tea light on it.  

These stamps are beautiful and were perfect for the window panels of this project.  I think this would make a lovely piece of home decor, or a lovely present for someone special.  The design can be adapted to suit any stamps as long as you use four images that will fit the panels.  
Thank you for visiting my blog today, I hope that you've enjoyed this post and that you will pop by again soon  :)


Tuesday, 11 July 2017

Time Travel


Hi there and welcome to my blog  :)  Today I am sharing a piece of mixed media with a Steampunk flavour that I created for the Country View Crafts Challenge Blog's July challenge 'Things with Wings'.  http://countryviewchallenges.blogspot.co.uk/
I have used Chocolate Baroque stamps from the Steampunk Travel, Steampunk Butterfly and Steampunkery sets; Distress Oxide inks, Sepia Versafine ink, copper embossing powder, white sand texture paste, Copper and Antique Silver Aztec paints, Brass gilding wax, Glossy Accents, Aqua Tints.


I took a piece of greyboard and painted a coat of white gesso onto it.  When dry I sponged wet DOs in three colours all over the panel.  I dried the panel and stamped corner images at the top, stamped and embossed winged images in the bottom corners then stamped cogs in 1st and 2nd generation ink.


Next I placed a stencil over the panel and added texture paste with sand in it, only through random areas of the stencil.  I wanted to give the effect of rusty old wire, broken in places.  When the paste was dry I painted it with Copper Aztec paint, and when that was dry I mixed teal and white Aquatints and added that on top of the copper paint.  This creates a verdigris effect adding to the rusty patina.  I repeated this process around the edges of the panel.  I love using this rusting technique!  


Now that the background was complete I could start making the embellishments and focal pieces.  I stamped a lovely Steampunk lace border onto acetate and embossed it with copper powder.  I stamped some text onto paper, tore the edges and blended DIs over the paper to age it.  I stamped a winged clock image onto a piece of white card and embossed it in copper.  I then painted it with silver and gold Aztec paints, and cut it out when dry.  To complete the piece I used Glossy Accents on the face and left to dry.  I die cut some little cogs out of black card and added gilding wax.


I painted a domino size piece of greyboard with copper paint, stamped some text as before, aged the paper then cut the words out.  I drew lines around the words then attached them to the little plaque.  I then attached all the embellishments to the main panel.


I love Steampunk, as you may have noticed lol!  I also love entering challenges - and this months theme gave me a great excuse to indulge myself!  This project makes a lovely piece of home decor, either for yourself or as a present.  
Thank you for dropping in to my blog today, I hope you've enjoyed this post and that you'll come back again soon  :)