Labels

Wednesday, 22 November 2017

Roses in Red


Hi and welcome to my blog  :)  I have a lovely floral card to share with you today.  It was one of my samples for some Chocolate Baroque tv shows earlier this year, and it is also being featured on the CB DT blog  http://chocolatebaroque.blogspot.co.uk/  as I am a guest designer there this month.  I have used CB stamps Floribunda Rose, Loving Sentiments, and Harlequin Rose sets; grey Versafine ink, Candied Apple Distress Ink, alcohol pens, gold marker pen, clear Sparkle pen; dies from my stash. 


I began this project by creating the focal panel.  I stamped the rose image in grey ink onto white card then coloured it in with alcohol pens.  I love using my pens as you can get such beautiful and varied results, depending on how much blending and shading you do.  When the colouring was finished I added some Sparkle pen to the netting in the background of the image then die cut it into a panel and added DI around the edges using the die as a stencil.  I added gold pen to the outside edges of the panel and matted it onto black card.   


On a white base card I stamped a single rose image in each corner using red DI.  I used a paintbrush and water to drag the ink through the image then added Sparkle pen.  I blended DI around the edges of the card. 


I added a sentiment in red DI at the bottom of the card then attached the panel.   


I really enjoyed creating this beautiful card, the focal image is so gorgeous and detailed that it doesn't need much more.  Roses are such beautiful flowers and are among my favourites, and these stamps are very lifelike.  This design would make a lovely all occasion card, and it can be tailored to suit the recipient by changing the colours.
Thank you very much for popping in today, I hope you have enjoyed this post and that you'll come back soon  :)  

Wednesday, 15 November 2017

Punky Baroque Chest


Hi there and a warm welcome to my blog  :)  I have a mini chest of drawers to share with you all today, I created it as one of my tv samples for the recent Chocolate Baroque Steampunk shows.  As you may know I LOVE Steampunk, and I use it quite a lot in my artwork.  This project is similar to the chest that I created in a previous post - Metal and Sparkle - but this time I have used stamps as well as embossing folders.   I have used CB Eccentric Edwardian, Steampunkery, Key to My Dreams sets; Embossing folder from my stash; gilding waxes, Aztec paints, embossing powders, black gesso, Glossy Accents, paper clay embellishments from my stash.


I painted a small MDF chest with black gesso, both the framework and the drawers.  When the paint was dry I added gilding waxes to the handles and the edges of the drawer fronts.


Next I embossed two sheets of black card using a folder, and added gilding waxes to them to create a sheet metal effect.


 I used some more black card to create the drawer fronts; stamping, embossing and painting the panels that I had cut to size.


I cut the metal sheeting card to size, leaving a little around the edges to fold over and neaten them.  I attached each panel with strong PVA, and added some 'rivets' made with the waste from die cutting cogs on a previous project. 


I used several embellishments to decorate the top of the chest, all of which I made myself; some are paper clay, some are stamped and embossed onto card and cut out. 


I stamped and embossed a key in gold onto black card and  then cut it out.  I added some ribbon and hung it on one of the handles.


The fob watch has been stamped and embossed onto card in gold, then   and Glossy Accents was added as glass.


I loved creating this little chest of drawers!  These stamps are so beautiful and detailed, and they suit this project so well.  This little chest not only looks good but it is useful too; whether it sits on a desk or craft table, or like mine it can go in the sitting room or bedroom to hold all the little bits and bobs that  you need from time to time - safely in one place Lol!


Thank you very much for popping by today, I hope you like this post and will come back again soon  :)  

Wednesday, 8 November 2017

Voyage of Discovery


Hello there and welcome to my blog  :)  I have one of my sample cards from the recent Chocolate Baroque Steampunk shows on tv to share with you today, which is also on the CBDT blog today.   I LOVE Steampunk, so working with these stamps was a dream!  I have used stamps from the Steampunkery and Steampunk Travel sets; Distress Inks, White Charcoal, alcohol pens,Sepia Versafine, gold embossing powder and clear EP.  


As always I stamped and cut out the images on copy paper, then used them to design the layout of my card. 


I stamped the Airship in Sepia ink and embossed it with clear EP.  I then masked the image and created a colourwash with Distress ink. 


When the background was dry I added some clouds with a white charcoal pencil.  These pencils are lovely for clouds and highlights, among other things, and are very easy to use.  


I removed the mask and used Distress inks to colour the image.


I used the white charcoal to add some cresting waves along the bottom of the panel, then blended DI around the edges.


On a white base card I stamped several words to create a border then blended ink around the edges again.  I stamped and embossed the winged cogs and heart image three times onto acetate in copper EP.  Next I coloured the images on the reverse side with alcohol pens and added a coat of white gesso to make the colour show through.  I then cut the images out.


I stamped the verse onto a piece of ivory card in Sepia ink and embossed it with clear EP.  I tore the edges, blended DI around them and added gold marker pen to create an aged look.


I matted the focal panel onto dark card and attached it to the base card.  I then attached the verse and embellishments with dimensional glue. 


This lovely card is quite a simple design but the airship image is so beautiful it didn't need much more.  I think this design is great for any age or gender, and for lots of occasions.  The focal panel looks so relaxing - what a lovely way to travel!
Thank you very much for popping by today, I hope that you have enjoyed this post and you'll drop in again soon  :)

Sunday, 5 November 2017

The Autumn Queen


Hello and welcome to my blog  :)   I'm sharing a card which I've just created for the Craft Stamper Magazines November 'Ready Set Stamp' challenge.  The theme is Falling Leaves and the colours specified are Burnt Orange, Burgundy, Chocolate Brown, Latte.  
I have used the Autumn Medley stamp from Chocolate Baroque, a Wood Grain stamp from Inkydoodles, leaf stamps and dies from Crafter's Companion and the leaf stamp from the Colours of the Wind set by Visible Images; Distress Inks, Distress Oxide Inks, Sepia Versafine ink, Sparkle pens, Glossy Accents, Gold Aztec paint, alcohol pens, and clear embossing powder.  


To create the background I took a piece of white stamping card and cut it to size.  I put three colours of Distress Oxide inks onto my glass mat and spritzed them with water.  I then moved the card over the inks to blend them.  I repeated this process with the Distress inks and let the card dry.  I then used a sponge to apply gold Aztec paint all over the panel.  The paint adds glimmer and texture to the piece.


I stamped the the two focal images onto copy paper and cut them out, so that I could place them on the BP and move them around until I was happy with the positioning.  I then stamped the images onto the BP in Versafine ink.


I embossed the BP in a folder from my stash which embosses leaf veins  then emphasised the pattern with DI.  It gives a lovely texture to the piece.


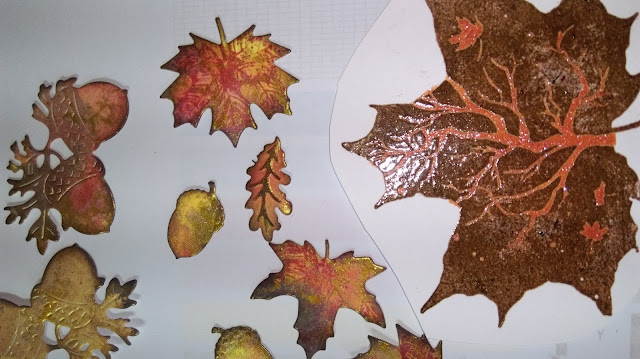
Next I turned my attention to colouring the focal images which I had already stamped onto white card with Versafine ink and embossed with clear powder.  The leaf is mainly a solid stamp  that has a tree and leaves as  negative images within it.  This  means that the card is left white, so I coloured the white card with a Sparkle pen.  The Autumn lady image is a beautiful stamp and it was a pleasure to colour in.  I used alcohol pens, then added Sparkle pen and Glossy Accents.  When dry I cut the image out.


This is the image when coloured but before the Sparkle pen and Glossy Accents were added.  


I created another BP as before and die cut some leaves.


I over - stamped some of the leaves to add detail, then added brown DI to the edges.


On a plain white base card I stamped the wood-grain image around the edges and blended a couple of DIs over the images, then added some 'nails' with a pen.  


I attached the BP to the base card.


I assembled all the elements onto the front of the card and attached them with dimensional glue.


I am so pleased with this!  It's the first time that I have used the Autumn Medley stamp and I absolutely love it!  I adore Autumn colours and I have MANY leaf stamps and dies, so creating this card was pure joy!  It is quite an elaborate card that would be suitable for many different occasions, for male or female or as a piece of Home Decor.
Thank you for popping by my blog today,  I hope that you have enjoyed this post and will visit again soon  :)


Wednesday, 11 October 2017

Autumnal Blossom


Hi there and a warm welcome to my blog  :)  Today I'm sharing a card that I made recently for my daughter's birthday.  As her birthday is in September, like mine, I decided to create a simple Autumnal design with a bright fresh feel to it.  I have used stamps from the Chocolate Baroque Fantasy Woodland and Mackintosh Words sets; Versamark ink, white embossing powder, Distress ink, Dyna paints, and white charcoal.


On a piece of Kraft card I stamped  a group of trees with Versamark ink and embossed it with white EP.    I positioned the group of trees slightly off centre then stamped and embossed a single tree on the other side.  I didn't want the trees to look as if they were 'floating' so I added some lines with a Versamark pen and embossed those in white as well.  This made the trees look 'grounded'.  I then edged the panel with gold marker pen.


I took a white base card and stamped a leaf image repeatedly around the edges to create a border, using first and second generation ink.  I then blended ink around the outside edges.


I painted the flowers on the trees with orange and gold Dyna paints and added some clouds using a white charcoal stick.


I added a sentiment from the Mackintosh Words set, stamped and embossed as before.  I added some dots around some of the trees with gold pen, then attached the panel to the base card.


This design is very simple and quite contempory for me - but I really love it!  It's good for those last minute cards we all need from time to time, but it doesn't look like a last minute job!  I have made a birthday card but I think this design is great for lots of occasions, and it's good for male or female cards too.  This is such a cheerful and bright design I'm sure it will put a smile on any recipients face!
Thank you so much for popping by my blog today.  I really hope you've enjoyed this post and that you will come back again soon  :)